If you have stumbled across this blog post looking for equivalent fractions worksheets, you may want to go back to your google search because you really won’t find worksheets here. What you will find is a packed post full of fun ways to teach an understanding of equivalent fractions in a deep way. This post will move students through the concrete (tools), representation (drawings), abstract (numbers and symbols) instructional sequence.
This is the time of year where I start to gear up for teaching equivalent fractions activities. The two main grade levels that have to tackle this foundational concept are third grade and fourth grade. Teaching equivalent fractions always feels daunting, but there are some fun ways that you can get your students working with them in a variety of settings. Using a bunch of different ways to teach it will ensure that you connect with every last one of your learners. After you’ve tried out different methods and activities, students will connect to their own best way. Equivalent fractions take a lot of time and practice, so it’s good to provide instruction in a variety of ways. The best part is the activities here can be used to teach equivalent fractions in both whole group settings and your small group teacher table, you just need to choose what works best for your classroom. Learning equivalent fractions in a fun way is also very motivating for kids! Some of these activities are fraction games, fraction number lines, and use manipulatives like fraction tiles, fraction circles and pattern blocks. The best part about teaching this way is that your fraction unit will be magical, and I want YOU to feel confident teaching fractions as well.
Start with the Foundation
The first thing, and most important part of your fraction unit, is that students must have a feel for the size of fraction pieces. This usually begins in first and second grade when they work with halves and quarters, but some students seem to miss it. I like to call this fraction number sense, which is the building blocks or the general understanding that fractions are just special kinds of numbers that come in between whole numbers. They need to know what the size of particular unit fractions feels like. What I mean by that, is that with a little experience, they should automatically know that 1/10 is much much smaller in size than 1/3. If your students don’t know this yet (especially your older students in fourth grade), you must start there. You want to start with activities that help them understand the size of the pieces.
The first thing I like to use to establish this foundation is a fun game called Fraction Formula. (paid link)Every student I play this with begs to play it again and again until I can barely stand it anymore. It is far and away one of my student’s favorite things.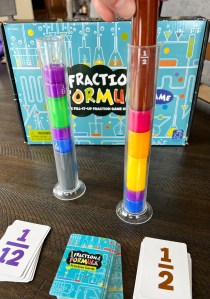 This is a great small group center once they are introduced to how to play the game. The object of the game is to take turns drawing a fraction card which all have different names, and get as close to 1 (1 is the top of the test tube) without going over. The nice thing about the game is that they get touch and physically handle the pieces (which coincidentally are benchmark fractions that they need to know!), and they see very quickly how it will pile up. They learn quickly which card they do NOT want to draw because the piece is too big. It is also a great activity because it naturally helps them with comparing fractions as well. I highly recommend this game as it goes beyond fraction circles and fraction tiles, giving them exposure with a manipulative that is highly engaging. I guarantee your whole class will love it.
Once you feel like your class has a good understanding of the size of the pieces of fractions, then it’s ok to move on to manipulatives to explore equivalence.
Exploring Different Types of Manipulatives (Concrete)
The next step in learning equivalent fractions is to explore different types of manipulatives using concrete models. Hands-on activities are really important for understanding fractions, because this leads to being able to use visual representations. Using visual representations is important for taking high stakes state tests-as they aren’t allowed to have concrete materials. Lots of classroom instruction is a great place to work in a hands-on way with these concepts so they don’t feel blindsided by the test.
Play-Dough First
The best way that I can think of to give real world experience with fractions is to use play dough. This is my all time big hitter great hands-on activity. Kids have so much fun using play-dough and they can screw it up as many times as they want and it’s easy to start over. However the most important part is to pretend that the play dough is different kinds of food items. Without the real world connection the point of the playdough is lost. The reason I love this, is that it lends to drawing fractions models easily, helping them be accurate with making equal parts. Here’s how you do it:
- Have your students make several of the same size of “cookies”. The whole has to be the same size. I like to use a square shape because it’s easier to make, and easier to cut. We “cut” our cookies using popsicle sticks for safety purposes.
- Tell them to cut different unit sizes, ensuring they are “cutting” the right sizes. Each piece after cut should be equal in size. As soon as they have made the cuts look equal, have them draw a visual model of it. Drawing the visual models is key to helping students move forward in their fraction thinking.
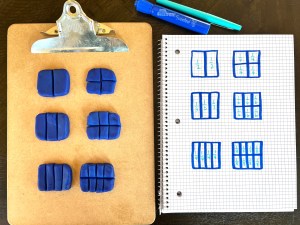
When you can see your students successful with square cookies, you can have them try to unitize other shapes (e.g. a candy bar rectangle, or a pizza circle). Half might look different with different original whole shapes!

Fraction Tiles – Hide the Labels
If you’re a follower of my blog, you know that I love to flip over fraction bars so that the label is NOT showing. You’re probably thinking that’s nuts, and how are they supposed to know what the pieces are? Well, when it’s written on it and given to them they stop thinking. What we need them to do is reason about the size. Without seeing the labels, they will very quickly find out the size of each piece by counting how many of them fit in one whole. After they’ve got a handle on the size of the different fractions, then you can start asking them to find equivalence by comparing the pieces.

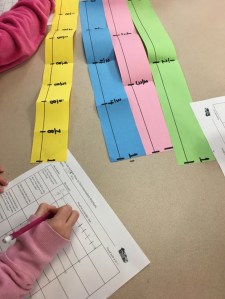
Fraction Circles without Labels
Fraction Circles are just like fraction strips or fraction bars, a great way to get students to figure out what size the pieces are. They work best when you use them without any labels. Same drill with these, show the whole number piece and have the students figure out the size of the pieces. Once they have named the pieces, have them try to find and record as many equivalent fractions as they can.

Pattern Blocks
Pattern blocks are another tool that many of us have, but typically only bring out for geometry. These also do not have labels, so in the same way you can use fraction strips without labels, you can have them explore the size of pattern block fractions. 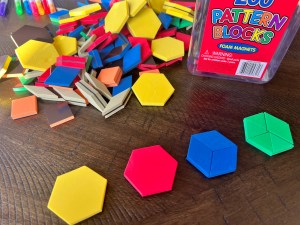
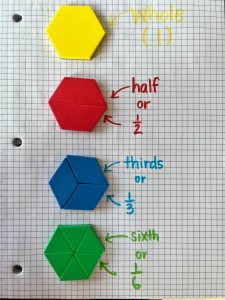
After they have figured out the sizes, they can do the same thing that you did with fraction tiles, lay them on top of one another to find equivalent fractions. I like to have them write it out in words to help them make sense of the fact that they are still relating their fraction pieces to whole numbers.
Here’s a pro tip, have different groups with each of these materials, and have student record their findings on a giant anchor chart. Start to look for patterns!
Moving to Visual Models (Representation)
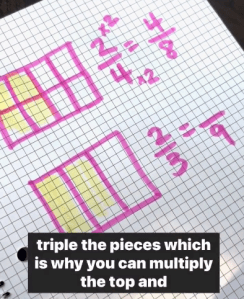
Once you feel like your students have a strong understanding of the hands on tools, then you will want to move to visual models for your equivalent fractions lesson. When students can draw visual models, they can actually visualize the tricky concept of equivalence. For example, if they draw a square and cut it in half, they can shade in one half of the square. One more cut doubles the size of the pieces, changing the size of the pieces (denominator) to fourths and changing the number of pieces shaded in to two.

This quick and simple visualization explains why you can multiply the numerator and denominator by the same number. All you need is a piece of paper and a drawing utensil. This is not an equivalent fractions worksheet, rather it’s a way for you to help students generate their own equivalent fractions. Worksheets often have the visuals drawn for them, and that takes away much of the learning. When you teach this way, you don’t have to have students remembering rules or tricks about when they have the same denominator or same numerator!
You can also use a fraction number line to help solidify this concept. Number lines can seem so abstract, but they can be less so when connected to something real life.
Please read about my driving example here and give it a try.
Applying the Knowledge to Real Life and Testing Situations (Abstract)
If, and only if you feel that students have a solid understanding of these concepts, can you finally introduce the idea that equivalent fractions can be found by multiplying or dividing the numerator by the same number. This is the shortcut that most of us were taught when we went to school, but we had nothing to connect it to. See this quick instagram clip to see what I mean:
Of course you know that I love real world connections, and I especially love when the real world connections turn into anchor charts. Have your students share equivalent fraction examples that they can find in real life! A little time spent on this important concept will go a very long way in their understanding of equal fractions.
For example:
- 2 quarters of a football game are in one half of the entire game! That amount of time is the same.
- If you are cooking, and you can’t find your quarter cup, you would need two eighth cups to have the same amount of sugar.
Another way I like to have them apply their knowledge is to do sorting activities. These kind of fraction lessons are great activities for really digging deep into this concept and applying what is known to “test like” questions. I cannot stand the thought of sending my students unprepared for state testing. Providing rigorous activities is an easy way to use the time at your teacher table to try to squash misconceptions. The photos below show how you can use these two different activities to determine which fraction concepts might still be shaky. They include answer keys as well so that you can quickly see if they are understanding.
In Reasoning Puzzles, students decide if statements are true or false based on the visual given.

In Piles, students turn over a fraction card and try to match it to an anchored card (the cards with the star) at the top. This is an awesome way for them to deeply explore equivalent fractions.

I hope this post has been a comprehensive way for you to explore some ideas for teaching equivalent fractions. I’d love to hear more about what you do in the comments!

Leave a comment